Tuesday, October 2, 2012

Swingarm, bevel box and rear suspension

OK, so moving right along. I am now working on installation of the swingarm, bevel box and rear suspension.

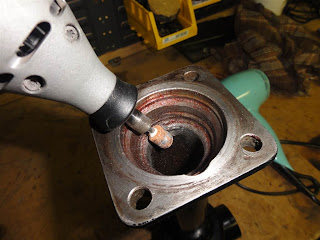
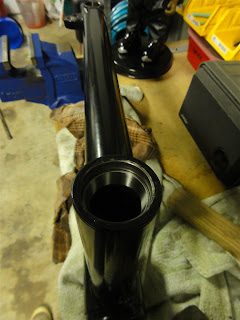
The first job is to remove the old carrier bearing from the swingarm. I had been putting this job off, simply because I had no clue as to how I was going to get it out. Looking down inside the swingarm from the bevel box end, there is very little 'lip' visible of the inner race of the bearing. This makes it hard (for me, anyway) to get enough purchase for a drift or punch to be able to work.

In the end I realised that if I could get something down the tubing that just fit with a millimeter clearance, it would still be too large to fall through the center of the bearing. All I would need to do then was whack it out with a drift. I fished around and found that a 22mm socket would do the job after I removed some of the redundant weld at the bevel box end.

So here goes...

Remove circlip with long-nosed circlip pliers

Grind off any rough weld

Heat swingarm with hairdrier to "bloody hot"

Drop the 22mm socket down the tube

Place improvised drift down the tube and give an almighty
whack! with a BFH


...and out she drops!


Empty!

Here is the culprit
The old cardan joint slips quite easily into the bearing and as you can see it would have been spinning inside the bearing rather than the bearing spinning with it. The old cardan joint also had a small amount of play in one end. It seems like this setup was due for replacement ASAP.  I am not sure of the history of the bike, so have no idea how many km/miles this setup had on it, but whatever it is, it was too many, haha!

Here are the old and new cardan joints. Out with the old and in with the new:


So that is it for the night. Not bad for less than an hour's work. I should not have spent so much time worrying about it!

3/10/12  UPDATE:

Tonight the new carrier bearing is in, and also the two swingarm bearing races:

Pre-frozen carrier bearing driven in, followed by the circlip

Apply heat

Apply force

Apply even more force!

Swingarm bearing race is home


7/10/12  UPDATE:

All available time this weekend was spent on completing the installation of the rear end of the bike.

I hunted around and sourced some 3% Moly grease for all the splines in the drive line and also some Loctite bearing retainer fluid to assist in the mating/fixing of the cardan joint into the carrier bearing. The cardan/U-Joint had spent a chilly night in the freezer prior to installation.


Grease splines

Apply bearing retainer

Temporary poly pipe guide to hold
joint in aligned position

Drop guide over U-Joint

Bash the shit out of it

Voila! Its in!
(don't forget to remove piece of poly pipe, Brad)
That wasn't too difficult after all. Thanks to all those who offered help via the AIGOR mailing list and also to Brett Rosenthal here in Sydney and Rodney Yeomans from up on the Sunshine Coast.

Ok, next, install swingarm. But before I do, time to torque up the frame and center stand bolts.

I'm scared!
I packed and installed the swingarm bearings, along with their spacers and seals and readied myself to this 'difficult' task.

Sometimes you can think too hard about things and how you are going to get them done. Sure, you gotta do your research so that you don't stuff up, but after that, it's best to get stuck in. I worried about the fitting up of the swingarm and the U-Joint to the transmission, getting the rubber boot on and aligning the swingarm. In fact I spent too much time on the inter-webs when I should have just gone out to  the shed and done the job.

The truth is, it was a piece of piss and took all of 10 minutes to get the arm on, the adjuster nuts loosely in, and the rubber boot fixed tight. The trick to the rubber boot is to fix it nice and tight to the transmission end, then roll it back on itself out of the way to allow for the easy alignment of the U-Joint to the transmission splines. Once that is done and the adjuster nuts go in, then just unroll the boot back over the swingarm and tighten the clamp.

Swingarm on
Once I got to this point, it was important to centrally align the swingarm using the adjuster nuts and a digital vernier caliper's depth probe to ensure that each adjuster (once snugged up to their bearings/not too tight/no side-to-side movement) sticks out the same distance from the frame. This should be done prior to fitting any suspension or the bevel box. It takes a bit of fiddling around to get both the tension and alignment done, but patience is the key here as it ain't rocket science baby!

After I was  happy with that, it was time to fit the lock nuts and tighten to spec. These nuts have a hole that allows the allen key to be fitted to the adjuster to stop any accidental tightening. The tip here also is to grease the adjuster's threads, and also to fill in the hole with grease. This will keep the whole assembly water free and  happy as there is no further access to these bearings etc.

Adjusting swingarm bearings and alignment
Tighten lock nuts while holding adjuster screw
in desired position
Next in line was to fit the Ikon shock on the brake side, remembering to smear some grease on the frame shafts first. The top nut will need to be removed later to add the hand-grip. However as the other end of the grip fastens to the brake proportioning valve that is not yet fitted, I have left it off for the time being.

One shock on
Then, it's around to the other side to insert the greased drive shaft to the U-Joint, add coupler and slide-fit the bevel box. Tighten up the four acorn nuts to fix it to the swingarm. NOTE: Brad, do not forget to include the O-ring between bevel box and swingarm.

Finally, fit the shock absorber, and we are all done!

Bevel box and shock absorber on

Another view

From the top
Luckily for me, all-round great bloke Brett Rosenthal paid me a visit (see next blog on the rear wheel), and pointed out that I had omitted to fit the battery strap and battery earth cables when I installed the battery tray. Thanks Brett, you saved me a shitload of trouble down the track!

Battery strap and earth cable installed
just in time!
And so here we end the saga of the rear end. Hopefully, all has been done correctly and the new U-Joint and bearing will go on to give many years of faithful service.

Coming up next, WHEELS !

Stay 'tuned'...

Sunday, September 23, 2012

Look what I've done!

Well, well, well, (three holes in the ground)...
What a surprise, the re-build has begun at last and over this weekend I managed to bolt some parts back together.

Prior to beginning this stage, I put some thought into how to best utilise the limited amount of space in my shed. As it gets built up, this project is going to have to share room with my daily runner, the Bandit, as well as what appears to be half the junk in Sydney. I am too cheap (read: poor) to afford a bike lift platform, so I decided to build a mobile platform strong enough to take the full weight of the bike and yet be easily movable by an old fart like me. Last weekend was spent building it and I am very happy with the way it turned out. The result can be seen in the first pic below. It is now a simple one-man effort to push the platform out into the middle of the shed for work, and then back to the side when I tuck it in for the night.

The other invaluable item has been the engine stand. Thanks to Marcello Forestieri for the loan! It has made the one-man assembly of the sub frame, center-stand and frame a doddle for even a newbie bike builder like me, haha!

I engaged the services of my teenaged son to assist in lifting the engine onto the stand, after which he quickly exited stage left. I have not seen him since! Oh well, motorcycling can be a solitary past-time...at least the faithful dog stuck by me.

Ready to rock. Mounted on engine stand and my home-built mobile work platform

Front view. Lovely Jubbly!

I then spent the rest of the day fitting the sub-frame and the center-stand. I am very glad I took some pics when I tore the bike down because this was like putting a jigsaw back together.


Sub-frame and center-stand fitted

Center-stand up and mounted. That is as clean as it and the gearbox
has been for over thirty years.

The knee-bone's connected to the thigh-bone, the thigh-bone's
connected to the hip-bone...
Last job for the day was to fit the steering bearings, steering column and lower triple tree to the frame while it was free and easy to turn upside down etc. After that I would be finished for the night and happy and ready for a nice feed and a cold beer, right? WRONG!

Before I could get out the door, the gorilla-man cameth.

You may remember from an earlier blog that I had to fabricate and weld a new steering stop to the frame. How proud I was of that job. And gee, it looked really pretty and all shiny and powder-coated, too. Except for one thing...I discovered that it was the wrong angle and the tabs on the triple-tree were barely making contact. Arrgghhhh!!!! I think I may have sworn and said a few naughty words at that point. For some reason, the dog was eyeing me closely.

What to do, what to do? The gorilla man in me suggested that it would be simple to put a little leverage on it and bend it to the correct angle. How hard could it be? Surely this would be a simple ten minute job, then I would be off inside for that well-earned cold beer.

What happened next reminded me of the story of the golf-pro who taught his pet gorilla to play golf. On the first tee, a 550m par 5, he handed the gorilla a Driver and it whacked the ball an incredible 550m, stopping a mere three inches short of the hole. The pro thought to himself, "Wow! This gorilla is my meal ticket to the big time". They walked up to the green and the pro handed the gorilla a Putter. The gorilla walked over to the ball and whacked it another 550m...

Out came my big shifting spanner which I used to grasp the tip of the wrongly-angled tab. A little upward pressure and...nothing. Hmmm. Maybe just a bit more pressure is all it needs. I pushed up harder and STILL nothing. Nothing to do now, but give it the full gorilla. The veins on my forehead started to bulge as I gave it my all. The dog inched closer, sensing the excitement. Memories of all those years as a kid, reading about the Bullworker on the back of the comics flooded back to me and I gave it one final mighty heave-ho, and CRACK!, I broke the f@#%ing thing clean off.

This time the words I uttered caused all the paint on the walls to blister. The dog took off out the door at speed as he sensed what may be coming next and he did not want to be any part of it! So much for that congratulatory beer... Needless to say, I did not sleep all that well that night.

Like the trooper I am, I was up early on Sunday and out to the shed, looking (praying?) for a solution. In desperation I started looking through my parts bin and there lying at the bottom of the pile I spied the prototype steering stop that I had made. It was a bit small for the original job and had been chucked into consolidated revenue. An idea flashed up and I realised that with a bit of grinding and fiddling it could be drilled and bolted up under and against the welded piece that was now sans-tab. Necessity is definitely the mother of invention and an hour or so later I had a working solution. It works a treat and is possibly stronger than my original design. Relief!

As you can imagine, after all that carry-on the rest was relatively easy: On with the frame and in with the bolts. I removed the bolts from the Menani rearsets and slotted then into the frame, and of course, the essential battery tray was bolted on to mesh the gearbox and frame. All bolts/nuts bolts are firmed up, but not yet fully tightened to spec.

This is beginning to look like a motorcycle again.

Steering in

There is a full bike in there somewhere, just waiting for someone
with half a brain to build it!
Next:
A replacement U-joint is due this week hopefully, so next job will be to get the swingarm, rear suspension and final drive on. I may also spend some spare time putting the wheels together with their carriers and discs.

Stay "tuned"...

Saturday, August 25, 2012

I gots me wheels!

Yay! The Borrani wheels are back and are all shiny now!


Nice job done by Ash's Spoked Wheels

Sunday, June 24, 2012

Of frames and engines...

Well, this has been a positive weekend for Project Crossbow and all the hard working staff (ie. me, haha!).

As mentioned in the previous blog entry, the frame, swing-arm and sundry bits and pieces were in for blast and powder-coat at Precision Coating Services in Seven Hills. I was informed that they were ready for pickup and I drove out there on Friday arvo. I was one happy chappy to get them home and see the lovely transormation that had taken place. Everything looked brand new again.
All the bits back home. All holes still plugged.
Close-up of steering-head... nice!
Me old mate JB 'Feels Good' about it, too
I had a bit of fun removing all the bolts, covers and plugs used to protect areas I did not want coated. It is nice to have the skeleton of the bike back in the shed and ready to get parts bolted back onto. I finally feel like some progress is being made.

Next job for the weekend was the engine (and gearbox). I had it zero-totalled at 68,000km and it now has 90,500 on the dial, so that's 22,500 km done in a bit over 4 years. There was no way I was gonna pull this baby apart just to be able to have the cases blasted clean. Also, I am making a bike I want to ride, not show, so a clean engine is all I need. Therefore the rest of my spare time in the man-cave was spent de-greasing the engine/gearbox and then scrubbing with various wire brushes.

Degrease, blow-dry, scrub. Repeat.
I am actually quite happy with the result. Sure, it could be better, but after a few weeks, months, years of use, what difference will it make!

A huge improvement over what it looked like before. Me happy!

That is about it for my weekend's efforts. The only other part to show is the dash setup that I am going to use in place of the big rubber car-type dash the LMII came with originally. I bought it through Stein-Dinse.

Simple and tidy... heaps better than original LMII dash IMHO

So, what's coming up next? I am waiting on the return of the Borrani wheels. Once they are home, I can get them shod, add bearings, carriers, discs etc. Then it will be possible to get the engine and suspension back on the frame... exciting shit, man!

...and one final conundrum: what to do about the mufflers. I am thinking of getting the whole setup HPC coated. However, the mufflers have small rust holes. I am thinking that these could be repaired, then coated? A new set of Lafranconi mufflers can be expen$ive. Any suggestions? Lemme know if you do.


Holy mufflers, Batman!

Stay 'Tuned' ...

Tuesday, June 19, 2012

What's happening? An update:

Okaaaaay... Time for an update on the project.

I have been stumblin' and bumblin' along with a few bits of progress made.

1. The frame and associated bits are at the powder coaters and should be ready for pickup this week. I ended up going with Precision Coating Services at Seven Hills. They are able to do all blasting and prep, as well as the coating and seem to have a pretty good reputation. I will post pics and a report asap I get the stuff back.

2. The Borrani wheels... I deliberated quite a bit over what to do with these as far as preparation for use goes. They were in pretty good nick condition-wise, with nice straight rims and very few nicks. However, there was some surface grit, grime, etc. and the hubs were quite darkened. I am not in any way wanting a concours-type bike, as I wanna ride it! But I do want to start with the wheels in a good (and safe!) condition. That means a pull-down to hub, spokes and rims; something I am confident in doing. HOWEVER, there is no way I am confident in re-assembly. Therefore I decided to bite the bullet and get the job done correctly by the professionals, and as such have shipped them off to Ash's Spoked Wheels in Brisbane. They will be getting a vapour blast for the hubs and a clean and polish for the rims and spokes. They will be ready in a couple of weeks and I will report back here with pics.

3. The fork lowers on the MkII are normally painted black. Over the 30+ years on the road, the paint on these had become chipped , worn and dulled. I decided that the not only was the paint to come off, but they were then to remain bare, as I think this will suit the overall look that I am seeking for the bike. So off to the local hardware store I went. Add one can of stripper and a few hours of elbow grease later: no more paint!

No more paint, plus added new dust covers
4. Now, for the biggie, as far as applying elbow grease goes: the engine/gearbox.
I am definately not inclined to pulling down a motor just to be able to get some blasting done. I don't need a 'new engine' look that badly, haha! My plan therefore is to just scrub the bastard clean, and stop when I have had enough (which could be very soon!). Here is the setup, after one afternoons's work. It consists of the engine on a stand in a kid's wading pool on a dolly. Thanks to fellow Guzzisti and champion all-round bloke, Marcello Forestieri for the loan of the engine stand. Much appreciated.

Wish me luck!
Well, that's about it for the moment. I will be back soon to report on the frame and wheels.

Stay 'tuned' ...