OK, so moving right along. I am now working on installation of the swingarm, bevel box and rear suspension.
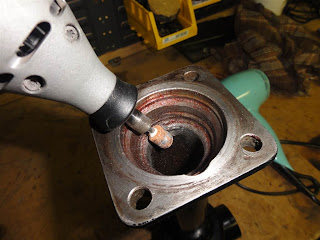
The first job is to remove the old carrier bearing from the swingarm. I had been putting this job off, simply because I had no clue as to how I was going to get it out. Looking down inside the swingarm from the bevel box end, there is very little 'lip' visible of the inner race of the bearing. This makes it hard (for me, anyway) to get enough purchase for a drift or punch to be able to work.
In the end I realised that if I could get something down the tubing that just fit with a millimeter clearance, it would still be too large to fall through the center of the bearing. All I would need to do then was whack it out with a drift. I fished around and found that a 22mm socket would do the job after I removed some of the redundant weld at the bevel box end.
So here goes...
 |
| Remove circlip with long-nosed circlip pliers |
 |
| Grind off any rough weld |
 |
| Heat swingarm with hairdrier to "bloody hot" |
 |
| Drop the 22mm socket down the tube |
 |
Place improvised drift down the tube and give an almighty
whack! with a BFH |
|
|
 |
| ...and out she drops! |
 |
| Empty! |
 |
| Here is the culprit |
The old cardan joint slips quite easily into the bearing and as you can see it would have been spinning inside the bearing rather than the bearing spinning with it. The old cardan joint also had a small amount of play in one end. It seems like this setup was due for replacement ASAP. I am not sure of the history of the bike, so have no idea how many km/miles this setup had on it, but whatever it is, it was too many, haha!
Here are the old and new cardan joints. Out with the old and in with the new:
So that is it for the night. Not bad for less than an hour's work. I should not have spent so much time worrying about it!
3/10/12 UPDATE:
Tonight the new carrier bearing is in, and also the two swingarm bearing races:
 |
| Pre-frozen carrier bearing driven in, followed by the circlip |
 |
| Apply heat |
 |
| Apply force |
 |
| Apply even more force! |
 |
| Swingarm bearing race is home |
7/10/12 UPDATE:
All available time this weekend was spent on completing the installation of the rear end of the bike.
I hunted around and sourced some 3% Moly grease for all the splines in the drive line and also some Loctite bearing retainer fluid to assist in the mating/fixing of the cardan joint into the carrier bearing. The cardan/U-Joint had spent a chilly night in the freezer prior to installation.
 |
| Grease splines |
 |
| Apply bearing retainer |
 |
Temporary poly pipe guide to hold
joint in aligned position |
 |
| Drop guide over U-Joint |
 |
| Bash the shit out of it |
 |
Voila! Its in!
(don't forget to remove piece of poly pipe, Brad) |
That wasn't too difficult after all. Thanks to all those who offered help via the AIGOR mailing list and also to Brett Rosenthal here in Sydney and Rodney Yeomans from up on the Sunshine Coast.
Ok, next, install swingarm. But before I do, time to torque up the frame and center stand bolts.
 |
| I'm scared! |
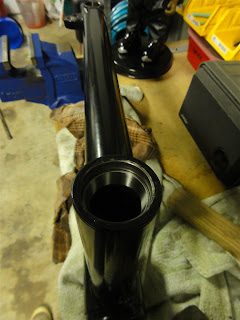
I packed and installed the swingarm bearings, along with their spacers and seals and readied myself to this 'difficult' task.
Sometimes you can think too hard about things and how you are going to get them done. Sure, you gotta do your research so that you don't stuff up, but after that, it's best to get stuck in. I worried about the fitting up of the swingarm and the U-Joint to the transmission, getting the rubber boot on and aligning the swingarm. In fact I spent too much time on the inter-webs when I should have just gone out to the shed and done the job.
The truth is, it was a piece of piss and took all of 10 minutes to get the arm on, the adjuster nuts loosely in, and the rubber boot fixed tight. The trick to the rubber boot is to fix it nice and tight to the transmission end, then roll it back on itself out of the way to allow for the easy alignment of the U-Joint to the transmission splines. Once that is done and the adjuster nuts go in, then just unroll the boot back over the swingarm and tighten the clamp.
 |
| Swingarm on |
Once I got to this point, it was important to centrally align the swingarm using the adjuster nuts and a digital vernier caliper's depth probe to ensure that each adjuster (once snugged up to their bearings/not too tight/no side-to-side movement) sticks out the same distance from the frame. This should be done prior to fitting any suspension or the bevel box. It takes a bit of fiddling around to get both the tension and alignment done, but patience is the key here as it ain't rocket science baby!
After I was happy with that, it was time to fit the lock nuts and tighten to spec. These nuts have a hole that allows the allen key to be fitted to the adjuster to stop any accidental tightening. The tip here also is to grease the adjuster's threads, and also to fill in the hole with grease. This will keep the whole assembly water free and happy as there is no further access to these bearings etc.
 |
| Adjusting swingarm bearings and alignment |
 |
Tighten lock nuts while holding adjuster screw
in desired position |
Next in line was to fit the Ikon shock on the brake side, remembering to smear some grease on the frame shafts first. The top nut will need to be removed later to add the hand-grip. However as the other end of the grip fastens to the brake proportioning valve that is not yet fitted, I have left it off for the time being.
 |
| One shock on |
Then, it's around to the other side to insert the greased drive shaft to the U-Joint, add coupler and slide-fit the bevel box. Tighten up the four acorn nuts to fix it to the swingarm. NOTE: Brad, do not forget to include the O-ring between bevel box and swingarm.
Finally, fit the shock absorber, and we are all done!
 |
| Bevel box and shock absorber on |
 |
| Another view |
 |
| From the top |
Luckily for me, all-round great bloke Brett Rosenthal paid me a visit (see next blog on the rear wheel), and pointed out that I had omitted to fit the battery strap and battery earth cables when I installed the battery tray. Thanks Brett, you saved me a shitload of trouble down the track!
 |
Battery strap and earth cable installed
just in time! |
And so here we end the saga of the rear end. Hopefully, all has been done correctly and the new U-Joint and bearing will go on to give many years of faithful service.
Coming up next, WHEELS !
Stay 'tuned'...


Thanks for the blog. Don’t understand how you got the UJ to align so easily though, damned thing flops all over the place. There are all manner of tricks, ty-wraps, waterpump pliers, swearing etc. But there is a dead easy way (applies also to BMs and a few other too). Align vaguely, slap on the LHS shocky, put into first gear, ignition kill, apply gentle pressure and prod the starter. Instantly rattles into place.
ReplyDeletexDrewX