
The front came with bearing carriers, but no rotors. The rotor carriers from my LMII wheel are too wide due to the narrowness if the mag wheel hub vs the greater width of the Borrani hub. What is needed therefore to adapt my semi-floating discs, is to fit them up to the narrower carriers from a Convert. These, too, were tracked down at further expense.
The rear wheel came with its own set of problems. There was no bearing carrier, but luckily I was able to get one for postage from one of a great bunch of blokes on the US-based Guzzitech forum. The rear rotor from my MKII mag then just bolts straight up to that.
Finally, a whole raft of sundry bits were tracked down second-hand via eBay or purchased new, including both axles, spacers, nuts, washers and bearings. Finally all parts were in my greedy hands and everything salted away for when I finally got around to assembly... or so I figured.
One thing that bugged me was that while the wheels were in good shape, they were showing their age. I attempted a refresh myself, but I learned very quickly that I don't have the patience for this tedious job.What I do have, however, is a credit card! So I packed then both up and shipped them off to Ash's Spoked Wheelz in Brisbane. When they came back, they looked brand new and unused, unlike my credit card which took the hammering of its life! Please do not ask me how much they cost, as I have erased the figure from my memory to protect my own sanity.
 |
| The wheels after full clean, polish, reassemble and true |
The carriers from the Convert were also tired looking, so I cleaned them up and gave them a fresh coat of paint.
 |
| Masked and undercoated |
 |
| Painted. That bottle was full when I started this job! |
Famous last words...
That is when the rear wheel hove into view and I took the same cavalier approach until the point where I installed the bearing spacer and it fell over inside the hub. It wasn't even making contact with the cups that hold the wheel bearings! WTF? Was it too short? Nope, it came in at 74mm which is the correct length. Time to take another look. Then it came to me. The center of the hub looked like it had shifted outwards, effectively increasing the distance between the wheel bearings. Could that be it? Hell, I had NEVER even seen the inside of one of these wheels before. How would I know?
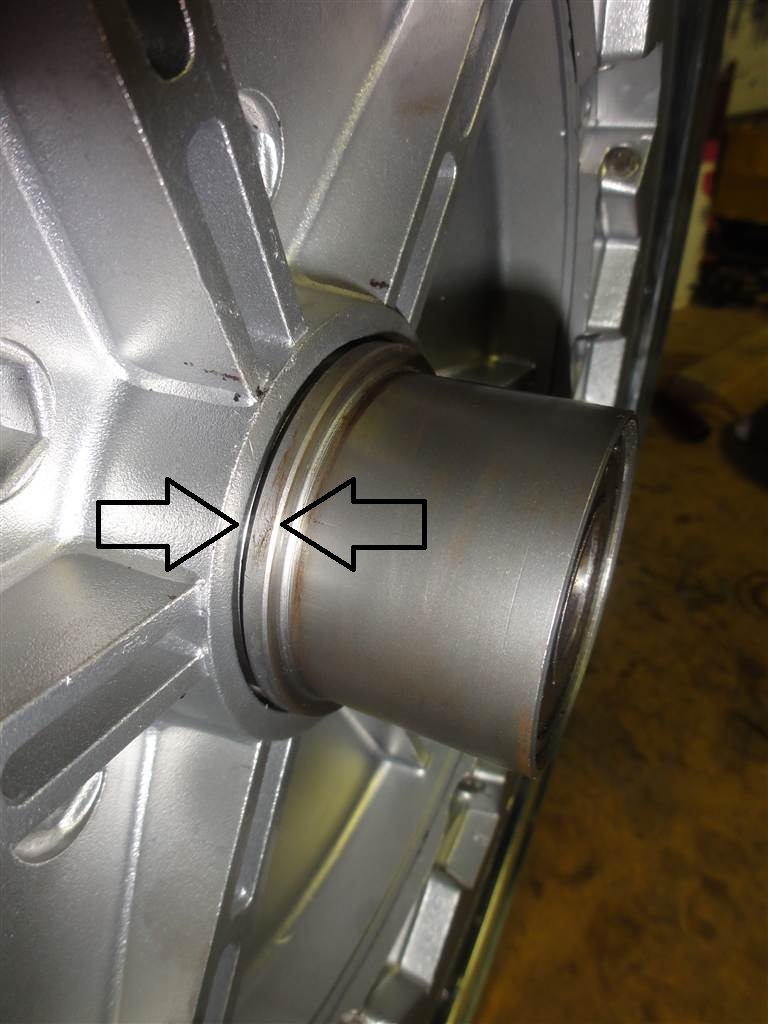 |
| This looks suspicious. Should the points indicated by these two arrows be meeting? |
 |
| The other side |
Maybe I am not the only one to never look inside a Borrani rear wheel, haha!
Anyhoo, I should have learned by now to go straight to the reliable source; AIGOR. In no time I had received valuable advice from Rod Yeomans, Doug Foskey, Mark Glanfield and Brett Rosenthal. The wheel hub had definitely shifted and needed pressing back in. Then, on the brake side there is supposed to be a 55mm circlip (obviously missing, haha!). The purpose of the circlip is now obvious.
So off I go down to the local hardware store and I picks me up some lovely 5/8th threaded rod and a handful of bloody big washers and nuts. Next, add a few bits and pieces found lying around in the shed and I haves me a make-shift press to do the job! Hyuk hyuk!
 |
| Spacers, lock-nuts, multigrips on brake side |
 |
| The business side |
 |
| Wind that bastard in! |
 |
| OMG, it's working! |
 |
| Now in correct position |
 |
| The brake side, now showing the channel for the circlip |
It sure is nice when something goes to plan. I was still short one circlip, but later the same day Brett Rosenthal came over for a squiz and what should he have in his box of goodies? Not one, but three circlips of the size and type needed for the job. Whatta guy! Thanks Brett, you saved me again. A quick check showed that the bearing spacer was a nice fit against the inner races of the two wheel bearings...relief!
 |
| I can see a spacer! I can see a spacer! |
Once that was installed I then proceeded to reassemble and fit the various bits that make up the cush drive. Prior to this install, I had drilled some holes through the rubber pieces. This is a widely recommended method for softening the cush drive up a bit to make things easier on the bike's drive components. I have seen recommendations to completely remove every second pair as well, but decided not to take that step.
One important step though, is to ensure all parts are nicely greased. This way, no parts will rust and bind the cush drive, negating its purpose and causing other drive components to wear abnormally or even fail completely. You must use rubber grease inside the drive as normal grease is likely to cause the rubber components to fail. Also, do not forget to install the O-ring on the shaft.
 | |
| 1. Cush rubbers drilled 2. Rubbers and cush drive plate greased with rubber grease 3. O-Ring installed on shaft 4. Shaft greased with bearing grease |
 |
| 1. Cush drive plate installed 2. Snap ring installed 3. Locking tab installed |
One thing that I have been told by numerous sources when mentioning the rear Borrani wheel is, "do not forget to install the 'top hat' spacer against the bearing on the brake side". Well, since I am yet to fit the wheel to the frame, I cannot do that yet, but I promise not to forget! Just for the record, so you all know what I am talking about, here are a couple pics of the spacer and how it should fit. Note how the smaller end of the spacer fits against the inner race of the bearing.
 |
| Spacer, circlip and bearing |
 |
| Spacer in position |
So, finally after all the drama all is good in the world and I now have two wheels ready for rubber and eventual fitting to the bike when the time is right.
 |
| Check out these beauties! |
Coming up next:
Not sure, haha! I think it could be overhaul, polish and fit front forks. I can then think about getting the brakes and wheels back on.
Stay 'tuned'...
As the new owner of an '83 Mk III this is incredibly inspiring. I discovered your blog tonight and read it from end to end and will read it again. Thanks for paving the way for the rest of us and keep up the good work!
ReplyDeleteHey, great to know someone is reading it, haha!
DeleteCongrats on the MkIII. You are in for a lot of rewarding moments. One of the helpful blokes I have mentioned often in this blog owns two of 'em (Rod Yeomans).
Stay tuned, as I hope to have another progress report, and keep the comments (and any questions) coming.
~ Brad